Rubber roofs are often chosen for their durability and sleek appearance, but even the best roofing can fall victim to wear and tear. If you’re a homeowner who has invested in a rubber roof, understanding how to address leaks is crucial. This blog post is your ultimate guide to rubber roof repair, including:
- Understanding your rubber roof
- The importance of timely repairs
- 7 steps to repair a rubber roof
- Maintaining your roof after repair
- Professional vs. DIY repair
🤔 Understanding Your Rubber Roof

Rubber roofs, often referred to as EPDM (ethylene propylene diene terpolymer) roofs, are popular for their resilience and flexibility. Made from synthetic rubber, these roofs can last up to 50 years with proper maintenance. They are resistant to UV rays, extreme temperatures, and weather conditions, making them an ideal choice for many homeowners. However, like any roofing material, they can develop issues over time.
A key advantage of rubber roofs is their eco-friendliness. Being made from recycled materials, they are a sustainable option. Additionally, their flexibility allows them to expand and contract with temperature changes without cracking. It’s vital for homeowners to recognize the value of these attributes and understand how to maintain them effectively.
Despite their durability, rubber roofs aren’t immune to damage. Over time, exposure to the elements can lead to minor tears or punctures. Spotting these issues early can prevent more severe damage and costly repairs. By being proactive, you can extend the lifespan of your rubber roof and maintain its performance.
Signs of a Leak in Your Rubber Roof
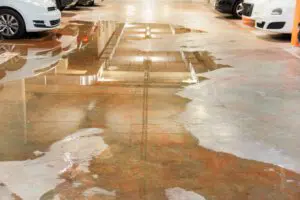
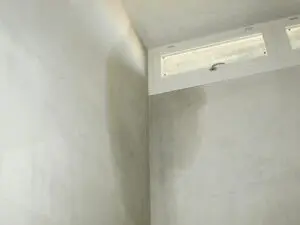
Identifying a leak early can save you from extensive damage. One of the first signs of a leak is water stains on your ceiling or walls. These stains often indicate water seeping through your roof, causing discoloration in your home’s interior. It’s crucial to inspect your roof regularly to catch any signs of leakage.
Here are some key indicators of a leak:
- Water stains: Look for discoloration on ceilings and walls.
- Mold or mildew: A musty smell or visible mold can signal moisture issues.
- Visible damage: Check for cracks, punctures, or lifted seams.
Leaky roofs create moist environments where mold thrives, posing health risks to you and your family. If you notice any of these signs, it’s essential to address the issue immediately. By maintaining vigilance, you can ensure your roof remains in good condition and provides the protection your home needs.
❗️ The Importance of Timely Repairs
Addressing leaks promptly is vital to prevent further damage to your home. Water infiltration can weaken your home’s structure, leading to costly repairs. By fixing leaks as soon as they are detected, you can preserve the integrity of your home and avoid larger issues in the future.
Timely roof repairs also protect your home’s interior. Leaks can damage your ceilings, walls, and personal belongings, leading to expensive replacements. Quick action can save you money and protect your home’s interior from unnecessary harm.
In addition to protecting your home’s structure and contents, timely repairs can extend the lifespan of your roof. Ignoring leaks can lead to more severe damage, requiring full roof replacement. By addressing issues promptly, you can maximize your investment and enjoy the benefits of a durable rubber roof for years to come.
Tools You’ll Need for Rubber Roof Repair
Before starting any repair work, gather the necessary tools to ensure a smooth process:
- Utility knife: Essential for cutting away damaged sections of the roof.
- Scissors or shears: Useful for trimming patches to the desired size.
- Roller: Ensures the patch adheres firmly to the roof.
- Paintbrush or roller: For applying adhesive evenly.
- Clean cloth or sponge: Crucial for cleaning the repair area before applying adhesive.
- Safety equipment: Gloves and goggles to protect yourself during the repair process.
Depending on the extent of the repair, you may need additional tools like a heat gun or sealant. Ensuring you have the right tools will make the repair process efficient and effective.
🛠️ 7 Steps to Repair a Rubber Roof

Repairing a rubber roof is crucial for maintaining the integrity of your home and preventing leaks that can lead to costly water damage. By addressing any issues promptly, you can extend the lifespan of the roof and ensure a safe, comfortable living environment.
1. Identify the Leak
Start by thoroughly inspecting both the interior and exterior of your roof. Look for visible signs of damage like cracks, tears, or punctures, as well as water stains on ceilings or walls that could indicate leaks. If possible, trace the leak back to its origin, which may require checking areas where seams meet or where the roofing material is joined. A systematic approach will help ensure you don’t miss any smaller leaks that could lead to bigger problems down the road.
2. Clean the Area
Before applying any patch, it’s crucial to clean the area around the leak. Use a clean cloth or sponge to remove dirt, debris, and any loose material that could hinder adhesion. You may also want to use a mild detergent mixed with water for more effective cleaning. Allow the area to dry completely before proceeding with the repair. This step is vital, as a clean surface ensures that the patch will adhere properly and create a watertight seal.
3. Cut the Patch
Once the area is clean and dry, prepare your rubber patch. Trim the patch to fit the damaged area, making sure it is slightly larger than the hole or tear—aim for a few inches of overlap on all sides. This overlap is important to ensure that the adhesive has enough surface to bond effectively. You can use scissors or a utility knife for precise cuts, and if needed, round the corners of the patch to reduce the chance of lifting.
4. Apply Adhesive
Next, you’ll need to apply adhesive to both the patch and the roof area. Use a paintbrush or a roller to spread a uniform layer of adhesive over the surfaces. Be generous but avoid excessive amounts that could ooze out when you place the patch. Make sure to follow the manufacturer’s instructions regarding drying time and application methods, as some adhesives may require specific conditions for optimal performance.
5. Place the Patch
After the adhesive has been applied, carefully position the patch over the leak. Align it accurately, and once in place, press down firmly to ensure that it adheres well to the roof surface. It’s important to do this step gradually and with care, as repositioning may be difficult once the adhesive starts to set. Applying even pressure will help eliminate air pockets that can cause future leaks.
6. Secure the Patch
To ensure a strong bond, use a roller to press the patch into place, working from the center outwards to push out any trapped air bubbles. This step is crucial, as air pockets can compromise the integrity of the repair. Pay attention to the edges of the patch, ensuring they are sealed snugly against the roof surface. Allow the adhesive to set as per the manufacturer’s recommendations for the best results.
7. Seal the Edges
Finally, apply a waterproof sealant around the edges of the patch to enhance durability and prevent water infiltration. Use a caulking gun for precision, and make sure to cover the entire perimeter of the patch. This additional layer of protection helps to fortify your repair, ensuring it withstands harsh weather conditions. Allow the sealant to cure completely before exposing the area to rain or moisture, giving you peace of mind that your repair is secure.
💡 Maintaining Your Roof After Repair
Proper maintenance is key to extending the life of your rubber roof. Regularly inspect your roof for signs of wear, such as cracks or lifted seams. Early detection allows for prompt repairs, preventing more extensive damage.
Keep your roof clean by removing debris, leaves, and dirt regularly. Accumulated debris can trap moisture, leading to mold growth and roof deterioration. Cleaning your roof at least twice a year is recommended to maintain its condition.
Consider applying a protective coating to your rubber roof after repairs. Coatings provide an additional layer of protection against UV rays and weather conditions. They can enhance your roof’s durability and reduce the frequency of future repairs.
👨🔧 Professional vs. DIY Repair

Deciding between professional and DIY repair depends on the extent of the damage and your skill level. Minor leaks can often be repaired by homeowners with the right tools and guidance. However, larger or more complex issues may require professional intervention.
Hiring a professional ensures the repair is done correctly and efficiently. Experienced roofers have the expertise and equipment to handle significant repairs. They can also identify potential issues that may not be visible to an untrained eye.
If you choose to DIY, be prepared to invest time and effort into learning the correct repair techniques. Thoroughly research the process and gather high-quality materials before starting your repair. This will increase your chances of a successful and lasting repair.
Common Mistakes to Avoid
Avoiding common mistakes can lead to more effective roof repairs. Here are a few key points to consider:
- Neglecting to clean the repair area: Dirt and debris can prevent adhesives from bonding properly, leading to poor patch adhesion.
- Using improper materials: Inexpensive or incompatible adhesives and patches can result in subpar repairs. Invest in high-quality materials designed for rubber roofs to ensure lasting results.
- Rushing the repair process: Take your time to follow each step carefully and allow adhesives and sealants to cure fully. Patience and attention to detail can prevent future leaks and extend the life of your roof.
🙌 Top-Notch Rubber Roof Repair: Trust AllPhase Restoration for Quality and Reliability
When it comes to rubber roof repair, trust the experts at AllPhase Restoration. With years of experience, our professional team is dedicated to providing top-quality roofing services to homeowners. Our commitment to excellence and customer satisfaction makes us the preferred choice for roofing projects.
At AllPhase Restoration, we pride ourselves on using high-quality materials and delivering exceptional craftsmanship. Our team of skilled professionals is equipped to handle any roofing challenge, ensuring your home is protected and secure. Choosing AllPhase Restoration means partnering with a trusted name in the industry. We understand the importance of reliable roofing and are committed to helping you maintain the integrity of your home. Contact us today to learn more about our services and how we can assist with your roofing needs.