Ever experienced the frustration of a leaky basement? If so, you know just how much of a headache it can be. But before you start stressing out, we’re here to help you tackle one of the most common sources of basement leaks: Where the basement wall meets the basement floor. In this guide, we’ll walk you through the steps to identify and fix these pesky leaks, so you can keep your basement dry and your worries at bay. Let’s dive in and get your basement back in tip-top shape!
Inside this blog:
- Common signs you have basement leaks
- How to identify the source of a basement leak
- 6-step guide to fixing a leaky basement
Keep reading to learn everything you need to know about how to effectively fix your basement leak where the wall meets the floor!
Signs You Have Basement Leaks

Before we jump into solutions, let’s first identify the signs that indicate you may have a leak where the wall meets the floor in your basement. Keep an eye out for the following telltale signs:
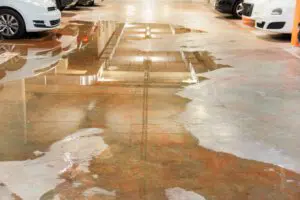
- Damp or wet spots along the base of the walls
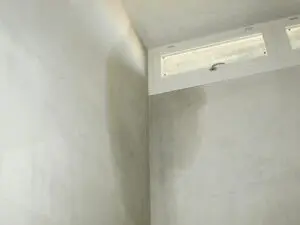
- Water stains or discoloration on the walls or floor
- Musty or moldy odors in the basement
If you’ve noticed any of these signs, it’s essential to take action promptly to prevent further damage to your basement and belongings.
How to Identify the Source of the Leak
Now that you’ve identified the signs of a basement leak, it’s time to play detective and pinpoint the source of the problem. Leaks where the wall meets the floor can be caused by a variety of factors, including:
- Cracks in the foundation or basement walls
- Gaps or holes in the sealant or waterproofing membrane
- Poor drainage or grading around the exterior of the foundation
- Hydrostatic pressure from groundwater pushing against the foundation
By identifying the specific cause of the leak, you can implement the right solution to fix the problem once and for all.
How to Fix Basement Leaks
Now let’s get down to business and talk about how to fix those basement leaks where the wall meets the floor. Here’s a 6-step guide to help you tackle the issue:
1. Inspect the Area
Start by thoroughly inspecting the area where the wall meets the floor to identify any cracks, gaps, or signs of damage. Use a flashlight and a magnifying glass if necessary to get a closer look at the problem areas.
2. Clean the Surface
Before applying any sealant or waterproofing material, it’s essential to clean the surface thoroughly to remove any dirt, dust, or debris. Use a wire brush or scraper to remove loose material, and then wipe the area clean with a damp cloth or sponge.
3. Apply Hydraulic Cement
For small cracks or gaps in the foundation or basement walls, hydraulic cement can be an effective solution. Mix the hydraulic cement according to the manufacturer’s instructions, and then use a trowel to apply it to the cracks or gaps, ensuring a smooth and even application.
4. Use Epoxy Injection
For larger or more severe cracks in the foundation or basement walls, epoxy injection may be necessary. This involves injecting epoxy into the cracks to fill and seal them from the inside out, providing a durable and long-lasting solution.
5. Install a French Drain
In cases where poor drainage or hydrostatic pressure is causing the leaks, installing a French drain around the perimeter of the foundation can help redirect water away from the basement walls. This involves digging a trench around the foundation, installing a perforated pipe, and filling the trench with gravel to facilitate drainage.
6. Improve Exterior Drainage
Finally, take steps to improve drainage around the exterior of your home to prevent water from pooling near the foundation. You can invest in an exterior drain tile system. This may involve regrading the soil, installing downspout extensions, or adding gutter guards to prevent clogs.
💧 Preventing Future Leaks

Once you’ve fixed the leaks in your basement, it’s essential to take steps to prevent future issues. Here are some tips to help keep your basement dry and leak-free:
- Monitor Moisture Levels: Keep an eye on the humidity levels in your basement and use a dehumidifier if necessary to keep moisture levels in check.
- Inspect Regularly: Regularly inspect your basement for signs of leaks or water damage, and address any issues promptly to prevent further damage. Likewise, check if you need a sump pump replacement.
- Maintain Gutters and Downspouts: Keep gutters and downspouts clean and free of debris to ensure proper drainage away from your home’s foundation.
- Seal Cracks and Gaps: Periodically inspect the walls and floor of your basement for cracks or gaps and seal them as needed to prevent water infiltration.
By taking these proactive measures, you can help keep your basement dry and leak-free for years to come.
🛠️ Fix Your Basement Leaks Like a Pro
Dealing with basement leaks can be a frustrating experience, but with the right knowledge and tools, you can tackle the problem head-on and protect your home from water damage. Whether you’re dealing with small cracks or larger issues, there are solutions available to help you fix the problem and prevent future leaks. Don’t hesitate to reach out to a professional if you’re unsure how to proceed or if the problem persists despite your best efforts. With a little time and effort, you can keep your basement dry and your worries at bay.
Contact our team of expert contractors at Allphase Restoration to get started on your next home improvement project! We’re excited to hear your questions and ideas and help bring your vision to life. For top-notch customer service and dedicated craftsmanship, reach out to our team today.